I've always LOVED sausage rolls! The first time I had them were at my friend Anisha's house! It got me hooked! They are the best finger food! So when Anne wanted to make them for a barbecue I was immediately excited!
Here are some step by step photos.....
Step 1: make your own italian sausage..... or well most recipes just tell you to go and buy italian sausages and then just remove the casing, but I wanted to make my own, so I just used ground pork and seasoned it with a variety of italian herbs - parsely, thyme, ground clove (go easy on this, we could really taste this when we tried the sausage rolls at the end), pepper, salt, onion, garlic, paprika, red chilli pepper flakes, oregano, etc etc.... just whatever you can find in your pantry.... =P do this a few hours before you are making the sausage rolls so that there's time for it to blend.... but I think even if you do it right before that's ok....
Step 2: pre-heat your oven to 400F
Step 3: roll out your store-bought puff pastry..... we were too lazy and short on time to make our own..... if you want to make your own, then you need to make it the night before or at least 6 hours ahead of time..... so just go and buy it!
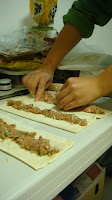
Step 4: cut the pastry into rectangles, line the middle of each pastry sheet with the sausage filling, brush with egg wash, roll over and seal
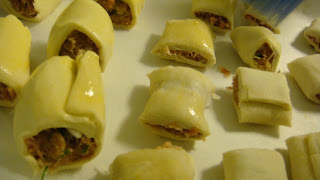
 Step 5: cut the long roll into small bite size and then brush with egg wash so that they come out of the oven golden brown
 VOILA!
We of course had to try them out and they were addictive! Although we could really taste the clove, so we made a note to let you know not be put so much in and be really careful! I don't measure when I season things, I usually just put in as much of whatever flavour/herbs as I like..... Enjoy!
And then we attempted to make Cha Siu Chan Bao.... that didn't really turn out like how we wanted it to, but they still looked great! hahahaha
Step 1: Make the dough, let it sit covered with a wet cloth, in a warm place (we put ours in the oven cuz we were in a hurry....lol... really) and then make the filling: using cha siu (cubed), chopped onion and a bit of hoisin sauce - EASY!
Step 2: After the dough has rested for 3-4 hours (that's a long time, we only waited for 2... the dough is supposed to have tripled in size... ours like it hadn't even doubled.....) take it out and knead it quickly, just to get it easy to work with... if you knead too long or too much then all the air escapes
Step 3: Start wrapping the fillings, just make a ball with a piece of the dough and then flatten it, put filling in the middle and pull sides up to cover


Step 4: place buns on a lined tray and bake.... now here's another problem, for some reason when I was copying down the recipe I didn't copy down what temp to set the oven to and how long to bake the buns for..... silly me!
Step 5: oh and brush with egg wash again for that golden colour..... we did this halfway through our first batch cuz we forgot.... again it wasn't written in the instructions.... =P

 The buns are not supposed to leak.... it just shows that we are not stingy with our fillings! hehehe


No comments:
Post a Comment